Tuesday, July 1, 2014

Yamato Maxius manual

 1. Fuel - this vehicle is equipped with GFS, and consumes REGULAR fuel, tank capacity is approx 3.7 gals, placed in front of driver. You can fuel it from left or right side.
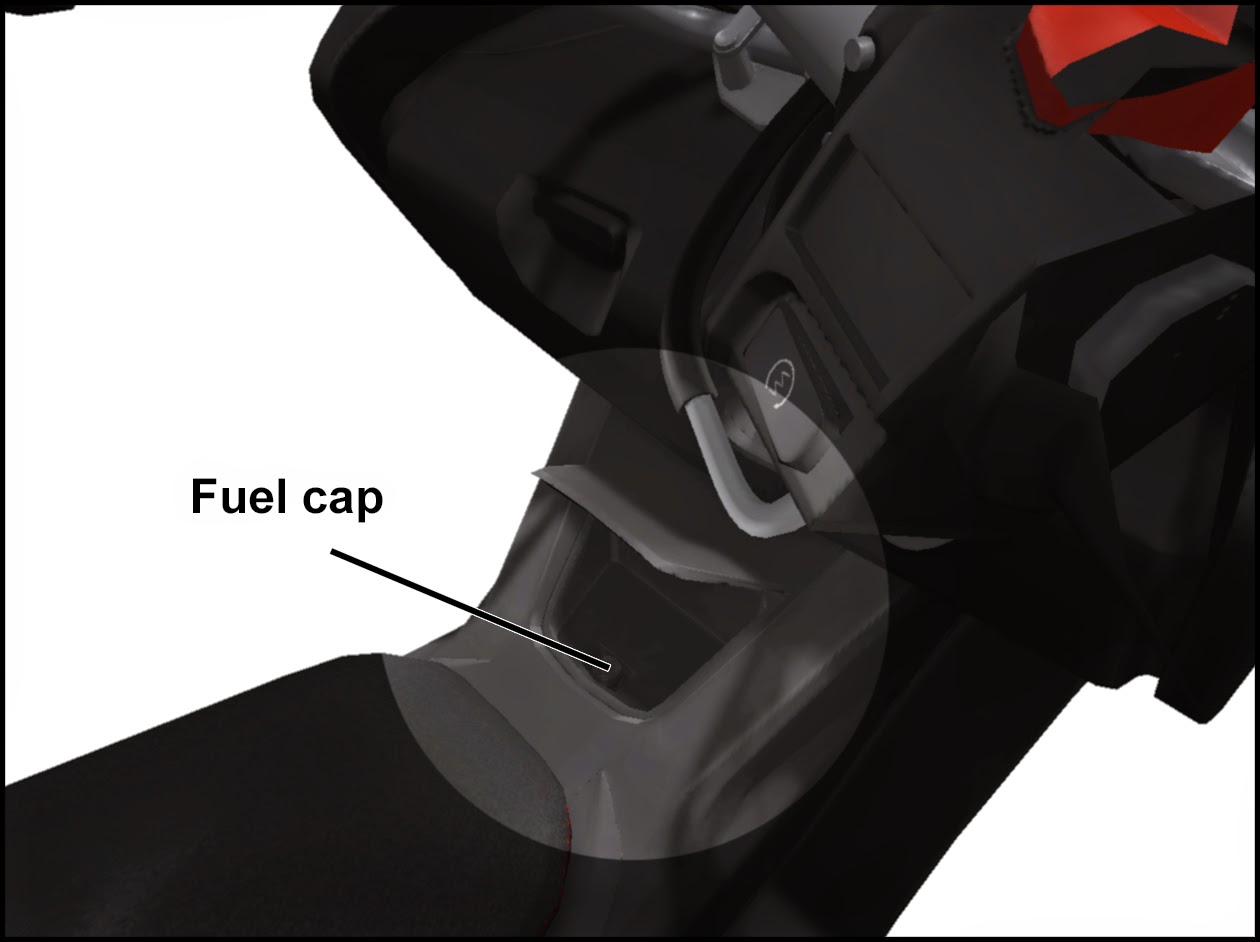
Fuel cap
 2. How to operate:
This vehicle can be operated by GEMC UniHUD, but most of functions are doubled on the vehicle as well.

2.1 To start/stop it by hand, first you heve to click keys to connect the ignition, then click red button on right hand grip to turn "engine cutoff switch" off, and then you can click the tiny button below it, marked with some sort of circle and  spring. That will do it. To switch engine off you can click red button to cutoff engine, or turn off the ignition by clicking keys. Or you can use HUD.

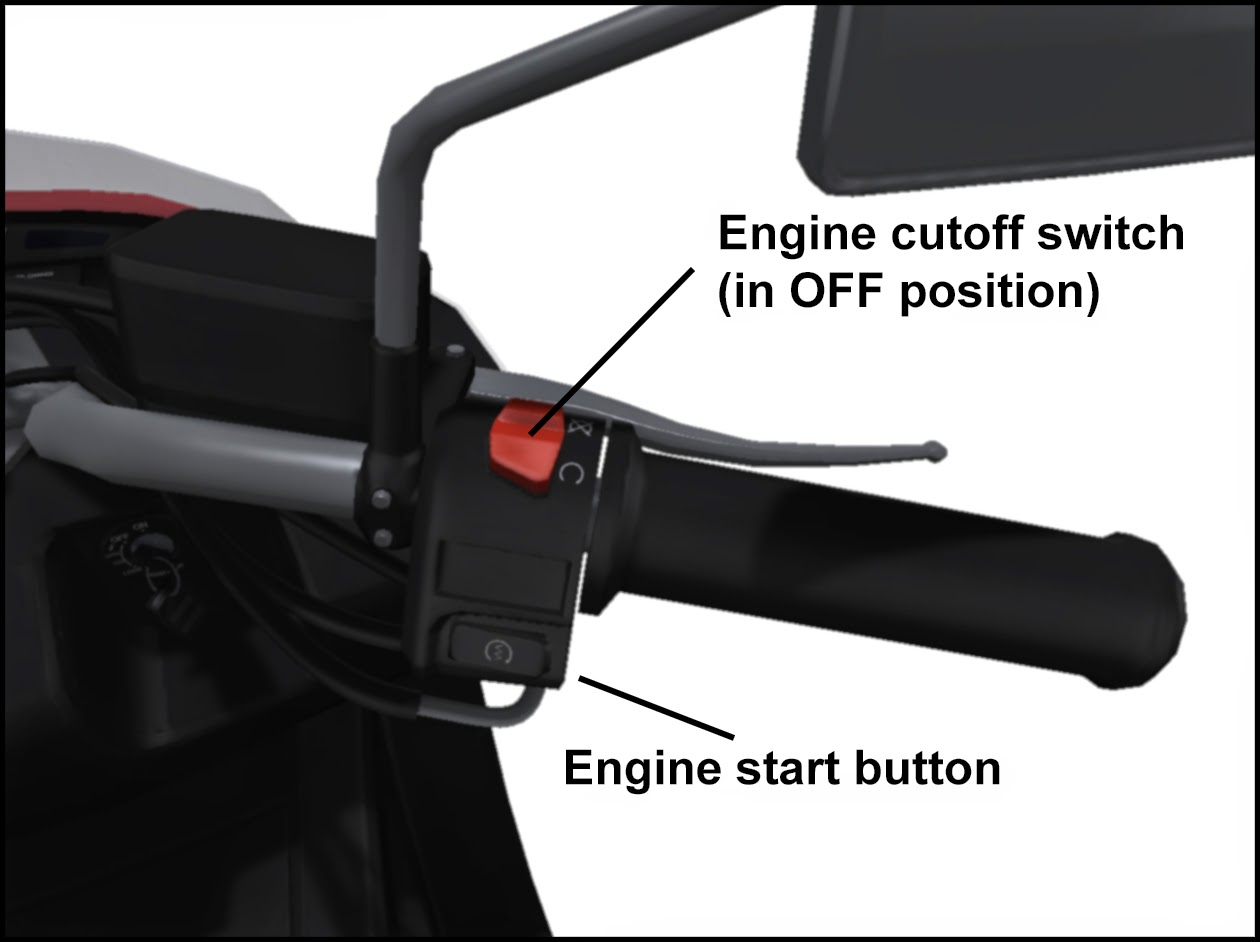
Right hand grip controls
2.2 Gearbox - there's belt-driven transmission, it's a sort of variator, so there are no actual gears. You push forward button - it goes forward, you push back button - it brakes, then if you push back button again you will start going backwards. Simple stuff.

2.3 Stands - you can click side stand or center stand to place scooter to certain position, like leaning. Also you can eject side stand by clicking C/PgDn button, and then when you leave scooter, it will automatically lean to side stand.
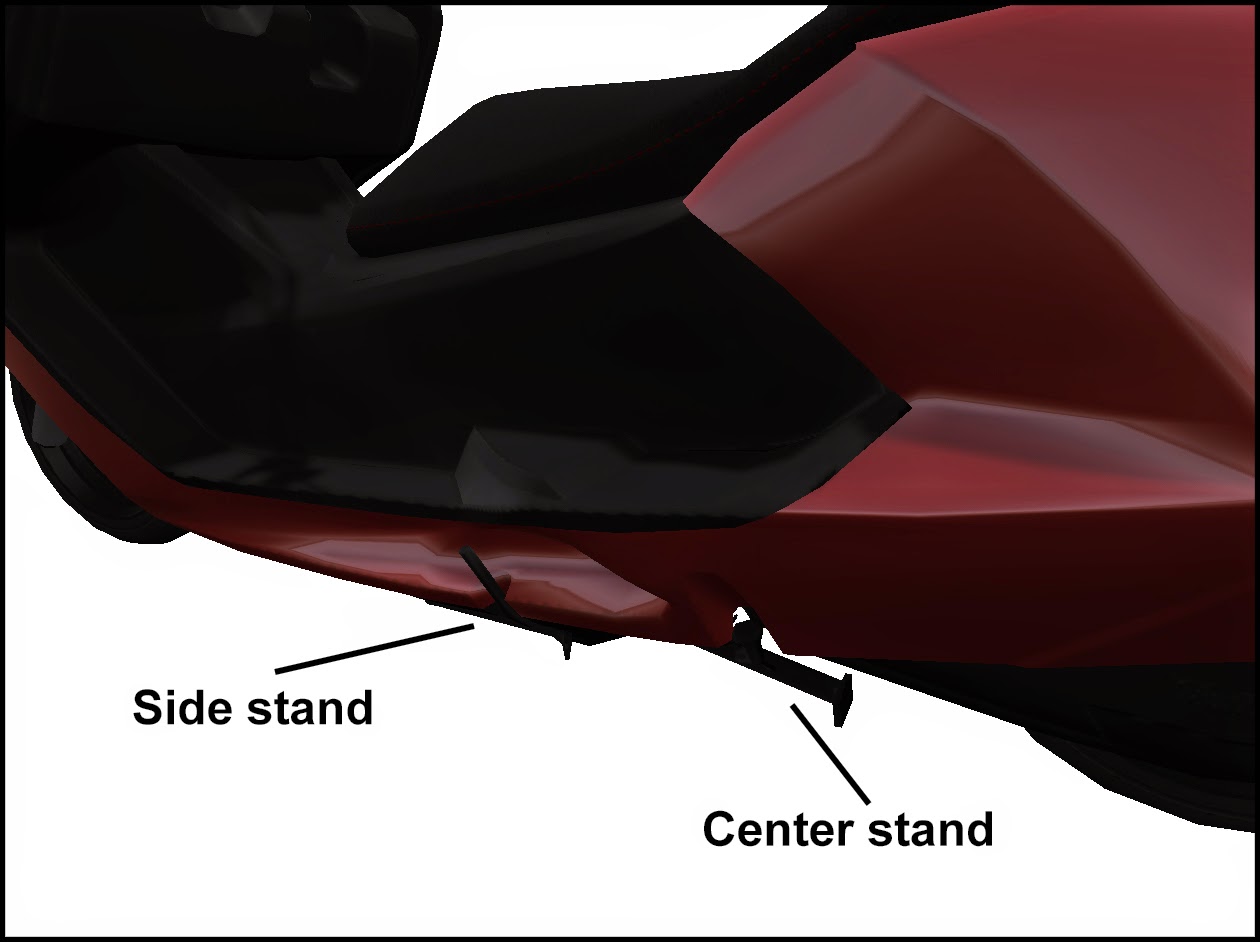
Scooter stands
3. Lighting - this vehicle has running lights which come up with ignition, and headlight that comes up with engine. You can switch between Hi and Lo beam, use the default "headlight" button on HUD or click gray switch on left hand grip on handle bar.

3.1 Turn signals - turn signals can be triggered by HUD or you can click tiny button on left hand grip. Click once for left blinker, click-hold-release for right(as usual).

4. Horn - horn can be triggered by E/PgUp button or by HUD, or by clicking "horn" button on left hand grip.

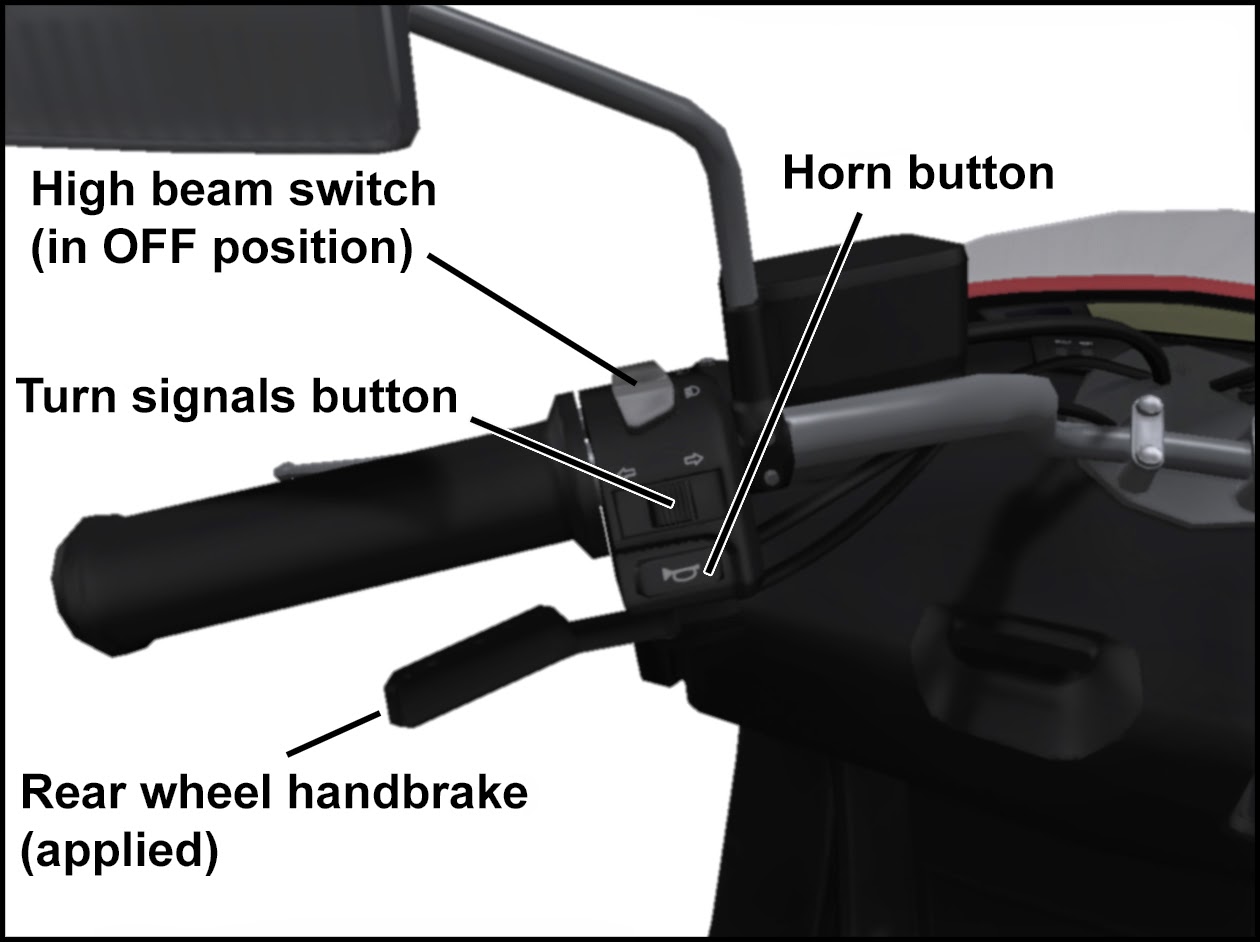
Left hand grip controls
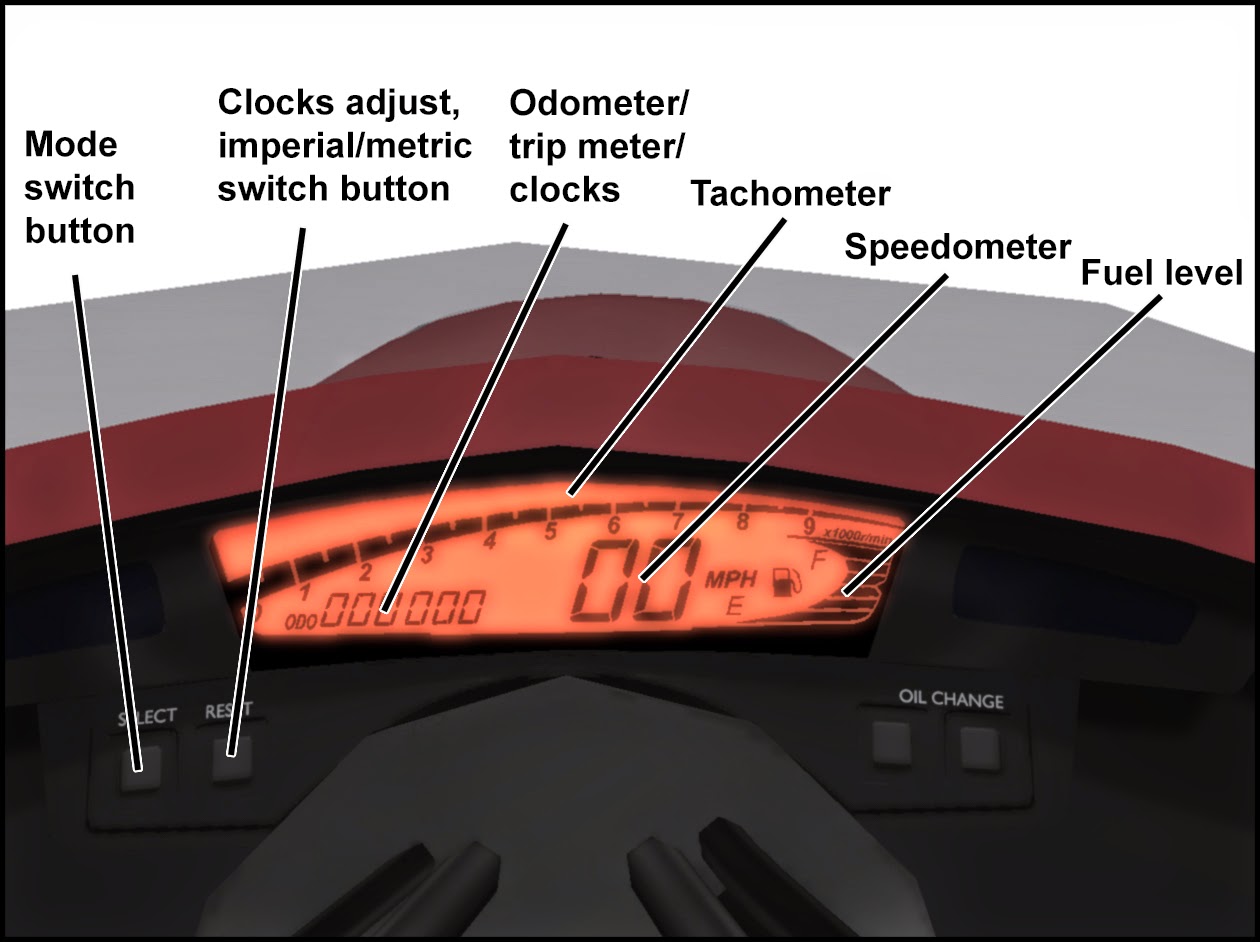
 5. Gauges cluster - there's fully digital LCD screen with multiple modes and information. Gauges output contains fuel level, rpm, speed, and some distance data/clocks

5.1 Odometer/trip/clocks - you can switch between modes by clicking "select" button to the left of the screen. it will switch the output to one of four modes. By default it shows your total distance(ODO). The layout is: ODO - TRIP A - TRIP B - CLOCKS. You can reset TRIP A and TRIP B data by clicking "reset" button.

5.2 Imperial/metric output - you can switch between miles and kms output. To do so, switch output mode to ODO and click "reset" button.

5.3 Clocks adjust - you can adjust your clocks to your time zone. To do so, switch output mode to CLOCKS, and click "reset" button to advance by one hour.

Gauges cluster
6. Compartments - there are four storages - glovebox, fuel tank area, under-seat trunk, and rear trunk. You can open and close them by clicking their lids.

7. Customizing - there's a Custom HUD for that, you can get it from the vehicle as usual through menu, there are 5 geometry addons, about 15 seat and plastic colors, and 5 rim colors. Also 16 sweet preset liveries, as well as custom plate mode, and custom liveries support(livery template).


GEMC, 2014

Saturday, June 7, 2014

Sweet discount time!

Good news everyone! We decided to cut prices for our old models, so that means that all nice GEMC classics are more accessable now!
From now on, our prices will break down like this:
2010 vehicles - 1000L$;
2011 vehicles - 1500L$.
So, it's one hell of a deal, sculpted vehicles still being unbeatable on customization field, offering wide range of replaceable parts from just fancy rims to full body kits, spoilers, suspension lift kits, and other things barely available with mesh.

As for the other news, I also replaced old ugly marketplace pictures for sculpted vehicles, and new ones were shot with ALM on, so you guys can see how well classic stuff blends in with new lighting model.
Also, there are couple of new products on their sluggish way to the market and half-dozen in "gonna finish when i feel like it" state, so GEMC mesh army will be growing further during summer.


Photo time


GEMC, 2014

Wednesday, March 5, 2014

GEMC Motorboat 1.1 update

What's fixed:
- Flag and antennas prim has no physics now, so you can pass through the back of the boat freely;
- Dashboard buttons now are more clickable, moved them to individual prim;
- UniHUD now can be transferred to guest drivers;
- v1.11(2014/03/07) - Custom decal modes for harbor name, boat name, and flag restored.

What's new:
- Added ability to fuel the boat while attached to trailer, so you can tow it to the fuel station;
- Added "Lag Adjust" sub-menu to the trailer, it allows you to tune trailer's catch-up speed.

GEMC, 2014

Tuesday, February 4, 2014

Trailers release


Okay, after a while we're okay to release couple of our new trailers. These are supposed to be dragged by Baiern Alpenjager and some of future vehicles. These things are not perfect, but running pretty stable, can cross sims borders, and are good in general.

GEMC Motorboat:
Marketplace: https://marketplace.secondlife.com/p/GEMC-Motorboat/5739711
Manual: http://sl-gemc.blogspot.com2014/02/gemc-motorboat-manual.html
SLURL: http://maps.secondlife.com/secondlife/Grenadier/169/139/22

GEMC Powerbox 150E trailer:
Marketplace: https://marketplace.secondlife.com/p/GEMC-Powerbox-150E-trailer/5739894

GEMC Motorboat manual

Common features:

1.Fuel - this vehicle is equipped with GFS fuel system. It uses REGULAR FUEL. It has one fuel tank, accessable from the right side. Fuel capacity is 27 gallons(100l). By default, fuel system is disabled.(Vehicle - Fuel System).

Fuel tank displacement
2. Gearbox - use up and down arrow keys or W and S to change gears between Reverse, Stop, Slow, Half, Full, and Emergency.

3. Lights - this boat has navi, spot, and interior lights. These are operated by buttons on boat, or via GEMC UniHUD(HUD guide). Headlights button controls spot light(must be enabled on Motorboat Custom HUD), fog lights button controls navi lights, and interior lights button controls interior lighting.

Boat controls
Other functions:

Customizing HUD(default&expanded)
4. Shade - to use the shade, enable it first via Motorboat Custom HUD. Once added to the vehicle, you can control it by simple clicking. If your shade is unfolded, you can also have festive lights added to it(via Motorboat Custom HUD as well). Festive lights are controlled by pannel on the back left side of the boat(connected to the festive lights cable).

5. Fenders - to use fenders, you should enable them in the "Fenders" tab on the Motorboat Custom HUD. Once these are visible, you can click them to attach to left or right side. If you have boat nose cover enabled, which makes fenders inacessible from the above, you can click on the left or right side of the space left by opened nose cover latch.

6. Multimedia system - this vehicle is equipped with GEMC standard audio loops player.
If you have "Interior accessories" enabled, you can have an access to the web via tablet placed on front passenger's folding table. To unfold the table, simply click it. To fold it, click the table again. To turn web browser off, click the objects on the table.

7. Passengers - This vehicle offers room for 3 passengers + driver(4 in total).

8. Customizing - this vehicle is using HUDs for customizing.
Click the boat for menu, then click "Customize..." button to get the "Motorboat Custom HUD". Next operations are pretty simple. That HUD has multiple tabs wtih different custom options.
There are 16 liveries, custom livery mode, various body trims, different parts, accessories and so on.

Boat hull livery template


GEMC, 2014.

Baiern Alpenjager 1.1 update

What's fixed:
- Electricity leak;
- Some minor visual issues on the console;
- Indicators brightness(dimmed by 50%).

What's new:
- Trailers support(see below);
- Day switch via clocks - just adjust the clocks back or forth until it passes 12 PM, so it will skip to next or previous day. Doesn't switch month if triggered on the month end or beginning(it takes hardcoding of all exceptions, so better be off without it).
- Steering adjust - "Customize..." - "Vehicle".  - Adjusts steering factor for the low speeds, might be cool for driving on thight spots.
-Automatic headlights mode. Lights come on with dusk, and goes off with dawn. Works only if there's a person sitting as driver.


TRAILERS
To use a trailer, you have to enable hook on your vehicle.
With hook enabled, back up to trailer's hitch area. When close enough(0.5-1.3m range), click the trailer and select "Attach" option in the menu. If all conditions are fine, the trailer will get attached to the vehicle. Now you're cool to drive around. To detach a trailer, click it, and select "Detach" option. Also trailer is getting detached if the vehicle's hook is removed.

Trailer operations
GEMC Powerbox 150E trailer:
This trailer produces electricity for its flood light tower.
To add or remove light tower, click "Light Tower" button in the menu. Light tower is operated by pannel on the front side of the trailer.
This trailer has optional GFS system. It uses diesel fuel. Filling should be performed from the right side. Fuel system can be disabled by clicking "Fuel System" button in the menu.
This trailer has multiple color options. Available colors can be selected in "Colors" sub-menu.

GEMC Motorboat trailer:
To deploy a boat, click "Detach Boat" button in the menu. To return already deployed boat, or add a new one(if deployed boat is not in same region), click "Return Boat" button.
If you submerge your trailer into water deep enough, the freshly deployed boat will have its physics turned on automatically.

Known issues:
- Trailer movement can appear to be choppy, depends on region performance.
- The distance between a tractor and trailer may increase at high speed, it's considered "normal".
- Trailer may perform in unusual way, responding to unusual operation of the vehicle(i. e. if one is trying to drive the vehicle up the wall, or jump off a cliff).


GEMC, 2014