Friday, December 31, 2021
Alasdair AL5 v1.021 update
Friday, December 24, 2021
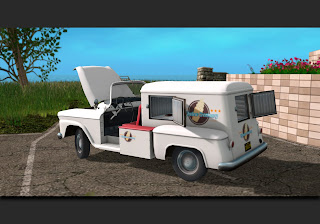
GEMC Ice Cream Truck manual
This vehicle is built under "Real Scale" initiative. Learn more: https://sl-gemc.blogspot.com/2019/03/real-scale-initiative-by-gemc.html
Common features.
1. Fuel - this vehicle is equipped with GFS fuel system. It uses REGULAR FUEL. It has one fuel tank, accessible from back. Fuel capacity is roughly 17 gallons(77 liter).
2. Electricity - this vehicle is equipped with a battery and
electricity
consumption system. Battery is located inside the engine compartment. The system supports all
GEMC batteries types, so you can choose your favorites. OEM battery
for this vehicle provide 80Ah output each.(see Batteries and electrical devices policy update for details).
 |
| Dashboard controls |
1 - headlights switch(2 positions);
2 - ignition key;
3 - turn signals switch(short click - right turn signal, long click - left turn signal).;
4 - windshield wipers switch;
5 - lighter(has no real purpose, you press it, and then it pops out after 10 sec);
8. Ice Cream and distributing goods - Since this is an ice cream truck, I've equipped it with content distribution system, so you can distribute your own ice cream(or whatever) to others. To do so, simply drop your items into the content of the vehicle(make sure Transfer permission on your items is ON), and when people click the openings in the freezer, they will receive a random object from the ones that you've put in the truck's content. You can use "Door Lock" button on the UniHUD to lock and unlock freezer doors. Also there's already an OEM ice cream included.
9. Customizing - click the vehicle to get the menu, then
click "Customize..." button, and you'll be presented with a number of
customizing options. This is a fairly utilitarian vehicle, and doesn't offer a lot of options, so there's just 4 factory liveries(1 of them clean so you can tint the body color using SL tools and use it as a regular refrigerated van), 3 colors for the seats, and NTBI GLPS license plate system. Additionally you can modify
the
vehicle using SL's building tool. Please make sure to turn the
vehicle's
"EDIT MODE" on before editing, to ensure the stability. You can make your addon prims move with the vehicle's bonnet. In order to
do so, add "ADDON_BONNET" prefix to their descriptions, in example: "ADDON_BONNET_CARGO" - that will make a prim move and be recognized by GTFO! system(see below).
9.1 EasyWheels project - I've added some code that lets you install any crappy ripped wheels(provided they're 1 prim each), regardless of their rotation, and without having to fiddle with numbers and whatnot. It can be done in a few simple steps:
1 - Set your car straight.
2 - Enable "Edit mode" via vehicle menu.
3 - Unlink current wheels and link yours.
4 - Set correct descriptions on your wheels(WHEEL_FL, WHEEL_FR, WHEEL_RL, WHEEL_RR).
5 - Turn off "Edit mode". It's done.
Edit mode and all the car rotation steps can be skipped if you're sure you can set wheels straight on your own. Failing to do so will make your wheels wobble when in motion.
10. GTFO! support - this vehicle supports GTFO! system(https://sl-gtfo.com) out of the box. You can attach your prims to the vehicle and use them as a cargo. To do so, change the description of your cargo prims to "CARGO"(without quotation marks). This will make those prims elegible for participation in our cargo loading/unloading scripted sequence. Cargo prims will be loaded starting with the ones that are placed deeper inside the vehicle, and going towards the outside. Unloading is performed in reverse. Additionally you can make your cargo/luggage prims move with the bonnet. In order to do so, add "ADDON_BONNET" prefix to their descriptions, in example: "ADDON_BONNET_CARGO" - that will make a prim move and be recognized by GTFO! system.
GEMC, 2021.
