Tuesday, December 10, 2013
Baiern Alpenjager release
Okay, we sorta released it.
Marketplace: https://marketplace.secondlife.com/p/GEMC-Baiern-Alpenjager/5577953
Manual: http://sl-gemc.blogspot.com/2013/12/baiern-alpenjager-manual.html
SLURL:http://maps.secondlife.com/secondlife/Magic%20Land/94/159/3701
Baiern Alpenjager manual
1.Fuel - this vehicle is equipped with GFS fuel system. It uses REGULAR FUEL. It has one fuel tank, accessible from the right side. Fuel capacity is 26.8 gallons(100 litre).
 |
| Fuel tank displacement |
3. Starting sequence - Baiern Alphanjager is equipped with new realistic startup procedure. Click key on the dashboard once to switch on ignition, and then click+hold to crank up starter. Depending on car's conditions, startup time may vary.
Other way of starting car up is clicking and holding a button on GEMC UniHUD v2(manual).And last way is to use gesture(in this case you just have to press a combo of buttons once, and wait for car to start up).
4. Gearbox - Baiern Alpenjager is equipped with automatic gearbox. You can switch between positions with E/C or PgUp/PgDn buttons.
Gearbox positions:
P - parking;
R - Reverse;
N - Neutral;
D - Drive.
 | ||
| Gauges cluster |
5.1 Interior lights - there are four interior lights. You can operate them by clicking the buttons shown on the following picture.
 |
| Ceiling buttons |
7. Safety belts - Baiern Alpenjager features safety belts option. When your avatar gets in, it automatically fastens a safety belt. To remove the belt, simply click it. To fasten belt again, click the belt one more time.
8. Multimedia system - this vehicle is equipped with advanced multimedia system. It features such options as Internet access, loops player, navigation system, as well as parking sensors, and various appearance tweaks. You can navigate through menu with navigation button, and select the options with "Select" button. To return to main screen, press the "Menu" button.(see buttons descriptions below).
 |
| Central console |
1 - Numbered buttons are used for binding or selected "favorites" tracks for audio player.
2 - "Input" button is used for input various data(UUIDs for audio player, and vector-based coordinates for navigation system(i.e. <128,128,128>).
3 - Sound volume adjusting button. Click on one or another end of it to increase or decrease volume.
4 - Clocks adjusting button. Adds or removes 1 hour(press on both sides of it).
5 - "Select" button. Used for confirm the choice in the Menu.
6 - Navigation buttons - use them to go through Menu postions, or change tracks in audio player.
7 - "Menu" button - returns to Menu screen.
8 - Play/Stop button for audio player. Clicking it outside of audio mode will stop the player.
9 - Temperature adjustment buttons. Temperature varies from 18 to 27 degrees(Celsius).
10 - Fan speed button(plus and minus).
11 - Power tailgate lid.
Other functions:
 | |
| Customizing HUD(default&expanded) |
9. Passengers - This vehicle offers room for 3 passengers + driver(4 in total). To get in as passenger, simply "sit" on the door leading to your desired seat.
10. Customizing - this car is using HUDs for customizing.
Body colors can be changed with help of UniHUD, and other options are placed on dedicated HUD. Click the car for menu, then click "Customize..." button to get the "Baiern Alpenjager Custom HUD". Next operations are pretty simple. The HUD has multiple tabs wtih different custom options. There are 16 liveries, custom livery mode, various interior trims, different parts and accessories, as well as sets of wheels and tires.
Also you can apply custom livery to the car body.
Baiern Alpenjager body textures template(1024x1024 original)
Baiern Alpenjager default normal map(4096x4096 original)
GEMC, 2013.
Wednesday, November 13, 2013
Updates for BUG-4084
GEMC, 2013
Sunday, October 13, 2013
Coventry Type 10 1.05 update
- Turn indicators fixed, now properly responding to HUD;
- Eject function on LHD version fixed, front occupants are ejecting by personal buttons now.
What's new:
- Passengers can't get into the car if the doors are locked. Owner can tho, because it's magic;
- Special module that updates vehicle vector and float parameters to remedy casualties from BUG-4084. It doesn't totally remove the bug, because it's LL's job and we have no control over it, but it lowers the chance of totally lose the vehicle after crossing.
GEMC, 2013
Saturday, October 5, 2013
Sim crossings issue
I made a JIRA issue ticket with our problem(https://jira.secondlife.com/browse/BUG-4084), so LL probably will fix it some day. Till that time please cross sims with SUPER CARE.
Sorry for inconvenience.
-BeckHan
Monday, September 16, 2013
Coventry Type 10 1.02 update
- Electricity leaks;
- Windows can be opened only when sitting inside for non-owner avatars.
- Physic model improved - car is sticking better to the road(gradeability slightly decreased, max slope for climbing is 35 degrees now);
- Steering tweaked a bit, less responsible at higher speeds.
What's new:
- Parking gear now turns physics off(if applied at speed less than 2m/s, otherwise you'll hear creaking noise);
- Sound effects for rolling on prim or terrain surface;
- Suspension creaks sounds when wheel is hitting the surface which is more than 15 cm higher or lower than previous.
GEMC, 2013
Wednesday, September 11, 2013
Coventry Type 10 manual
1.Fuel - this vehicle is equipped with GFS fuel system. It uses REGULAR FUEL. It has two fuel tanks - one on the left, and one on the right side. Both tanks are used for feeding the engine. When one tank runs out of fuel, vehicle switches to another automatically. Tanks capacity is 12 gallons each. To pick which tank you want to fuel, simply open the fuel tank cap.
 | |
| Fuel tanks |
Unusual functions and buttons:
3. Gearbox - Coventry Type 10 is equipped with automatic gearbox. You can switch between positions with E/C or PgUp/PgDn buttons.
Gearbox positions:
P - parking;
N - neutral;
D - Drive;
L - Low;
R - Reverse.
4. Interior starting operation - this vehicle uses ignition key to connect battery, and starter button to start the engine. To start vehicle from the inside, click the key in the middle of dashboard(or its pedant), then click the "Starter" button. To switch engine off, simply click key again.
5. Headlights - headlights switch is placed in the middle of control pannel, and features two light modes - parking lights, and headlights. Click the switch to advance, click and hold to get back.
6. Fuel gauge output - this vehicle is equipped with two fuel tanks, but only one fuel gauge, and shows only one tank fuel level at time. To switch fuel level output, click the "Fuel" button.
7. Gauges illumination - gauges illumination has two levels of brightness. You can switch between them with "Panel" button. Single click to advance to next illumination level, click+hold to get to previous level, or turn illumination off.
8. Wipers - wipers has two levels of speed. You can switch between them with "Wiper" button. Single click to advance to next speed, click+hold to get to previous speed, or turn wipers off.
 |
| Controls |
9. Quarter windows - this vehicle is equipped with quarter windows vehtilation. You can open quarter windows on front and rear doors by simply clicking them.
10. Picnic tables - this vehicle is equipped with three picnic tables - front one is hidden below middle controls cluster, and rear ones are mounted in the backs of front seats. You can expand or fold all tables by clicking them.
Other functions:
11. Passengers - This vehicle offers room for 3 passengers + driver(4 in total). To get in as passenger, simply "sit" on the door leading to your desired seat.
 |
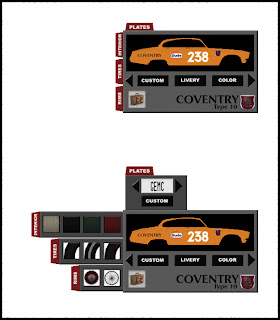
| Customizing HUD(default appearance and expanded tabs). |
Next operations are pretty simple. That HUD has multiple tabs wtih different custom options.
There are 16 liveries, custom livery mode, various interior trims, as well as sets of wheels and tires. Coloring the car is accessable from GEMC UniHUD.
Also you can apply custom livery to the car body.
Livery template
Default normal map(4096x4096)
GEMC, 2013.
Friday, May 24, 2013
Minamoto Sky Traveller release
Here's the SLurl: http://maps.secondlife.com/secondlife/Magic%20Land/87/164/3701
Here's SL MP page: https://marketplace.secondlife.com/p/GEMC-Minamoto-Sky-Traveller/4918683
Enjoy.
Minamoto Sky-series bus manual
This vehicle is built under "Real Scale" initiative. Learn more: https://sl-gemc.blogspot.com/2019/03/real-scale-initiative-by-gemc.html
In this article we will highlight most bus features required for every day use.
Common features.
1. Fuel - this bus is equipped with GFS fuel system. It uses DIESEL FUEL.
Sky Traveller has two fuel tanks - one on the left, and one on the right side. Right side tank is used for main engine, an left tank is used for air conditioner engine and air compressor engine. Tanks capacity is 52.8 gallons each.
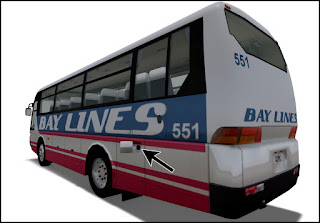
Sky Messenger has a single tank, and its cap is located by the left rear wheel.
 |
| Main and auxiliary tanks on Minamoto Sky Traveller. |
 |
| Fuel cap on Minamoto Sky Messenger. |
2. Electricity - this vehicle is equipped with two batteries and electricity consumption system. Batteries are located under the vehicle, next to the main door. The system supports all GEMC batteries types, so you can choose your favorites. OEM batteries for this vehicle provide 80Ah output each.(see Batteries and electrical devices policy update for details).
 | |||
| Batteries compartment |
 |
| Buttons on side console. |
6. Compressed air system - multiple systems of this bus are using the compressed air. Air is stored in the air tanks and its pressure is shown on dashboard gauge. Once the air pressure is going low, air compressor turns on automatically(if there's fuel for it, and main engine is running). You can turn on air compressor manually by pressing "AIR PUMP" button on the dashboard extension below the side window. Compressed air is used for operating main door, suspension lift, and brakes. As pressure falls, these start to operate worse.
6.1. Also compressed air is used to start the main engine in case of emergency(i.e. flat batteries). To do so, click ignition key to put it to Stage 1(ignition connect), and press "EMERGENCY STARTER" button. It will start the engine if there's any air pressure. Some compressed air will be spent during this operation.
7. Suspension lift - the bus is equipped with suspension lift. It will lower the front part by 8cm to allow easier entrance and exit. To operate the lift, press the "LIFT" button on the dashboard extension. It will operate the suspension one or another way(if there's any air pressure). Some compressed air will be spent during this operation.
8. Emergency starter - this bus is equipped with emergency starting system, which takes no electricity to spin the engine crankshaft. Check part 6.1. for details on operation.
9. Message display - there's an interior message display, which shows various warning and information messages to passengers. To turn it on or off, click the "MESSAGE DISPLAY" button on the dashboard extension below the side window. The message display switches between lines with 3 seconds step. To switch lines manually, press one or another arrow on "DISPLAY" button placed next to previous one.
10. Route sign - the sign is placed in front of the bus between headlights. Pressing "ROUTE SIGN" button will turn it on or off. Sign can be changed to one of predefined settings or used for displaying your custom image with bus Custom HUD(see chapter 13).
 |
| Dashboard. |
12. Media unit - this thing has 3 modes - TV, camera, and Web. To turn it on or off, press the "power" icon button. In TV mode it plays the looped "TV" animations. In "camera" mode it plays "static" animation, as SL does not support "picture-in-picture" effect. Web mode allows you to surf the web, using built-in web browser. "Channel" buttons are used for changing "TV" animations in TV mode.
13. Air conditioning unit - this thing is really simple. Press arrow down to turn it off, and arrow up to turn it on. "Fan" icon buttons increase or decrease air blow in the conditioning vents.
16. GTFO! support - this vehicle supports GTFO! system(https://sl-gtfo.com)
out of the box. By default, this vehicle uses its built-in luggage for
GTFO! visuals(roof rack must be enabled), but you can attach your prims
to it and use them as a cargo. To do so, change the description of your
cargo prims to "CARGO"(without quotation marks). This will make
those prims elegible for participation in our cargo
loading/unloading scripted sequence. Cargo prims will be loaded starting
with the ones that are placed deeper inside the vehicle, and going
towards the outside. Unloading is performed in reverse.
GEMC, 2021.
Wednesday, May 22, 2013
Gmünd Stuttgart Ferdinand v1.3 update
Here's the list of all new things in this update:
1. Top speed tweaked, it's about 2 times faster now or so.
-Clocks custom time zone bug totally fixed, using llGetUnixTime now(credit goes to Aryn Gellner for pointing at that function).
2. Heating and temperature issue fixed, engine heats up and cools down smoothly now.
3. New code for gauges cluster warning lights - smaller size and more effective.
4. Electricity and charger code changed - make sure to rez your GEMC JG 1500 Charging unit and accept update.
Couple more words about new charger code. With this update we added llCastRay function to it, so it can detect the vehicles better. All you have to do is to "aim" the charger to make it face the car you want to charge(same way as GFS fuel cans). So now it will not pick wrong car if there are more than one in charger range. That's it for now folks, hope you'll enjoy new update.
Sunday, March 17, 2013
Sunday, March 10, 2013
Gmünd Stuttgart Ferdinand update
Here's a list of stuff we added and fixed:
1. NTBI GFS added(more detail, video). You have to pick fuel manually by clicking one or another button on GFS fuel pump. Picking wrong fuel will result in engine damage(RP feature). You can disable and re-enable fuel system by clicking car for menu, then going to "Vehicle", and clicking "Fuel System" button.
2. Script time greatly reduced, from 0.45 in v1.0 to 0.02-0.03 in v1.2 in parked mode. It's below average avatar script time.
3. Rebalanced handling. Car turns more sharp now, still offering pleasure of driving on cruise speeds.
4. Different fixes and improvements. Small script memory reducing, LCD clocks fix(custom time zones fixed), "simplified" gearbox mode revived in some sorts, glowing brake disks rebalanced(now cool down longer for show purpose), paintable bumpers added("Rear doors" paint button on UniHUD), and so on.
5. Batteries code changed - old batteries are not working with new car. Contact BeckHan Ra if you have old batteries you'd like to replace with new ones.
GEMC, 2013.
Monday, January 28, 2013
Blur
Let's give her some thumbs-up, I bet it was hell of a job to shoot such a professional thing in SL.


